 International
 Singapore
 Malaysia
 Thailand
 Vietnam
Không có sản phẩm trong giỏ hàng!

Maker Nano Heartbeat Monitoring With Mlx30102
- Hussien Jawhar Sathik
- 03 Mar 2022
- Tutorial
- 962
Introduction
In this tutorial we shall see how to measure the heartbeat using the Maker Nano with Mlx30102 and display the value on the Oled display.
Video
Hardware Preparation
This is the list of items used in the video.
Building The Circuit
- Constructing the circuit is pretty straight forward since the circuit is constructed on a breadboard. Both the Oled and Max30102 use the i2C interface, hence the SCL and SDA pin of the both device can be connected to pin A4 and A5 of the Maker Nano respectively. And both the devices can be powered via 3.3V.
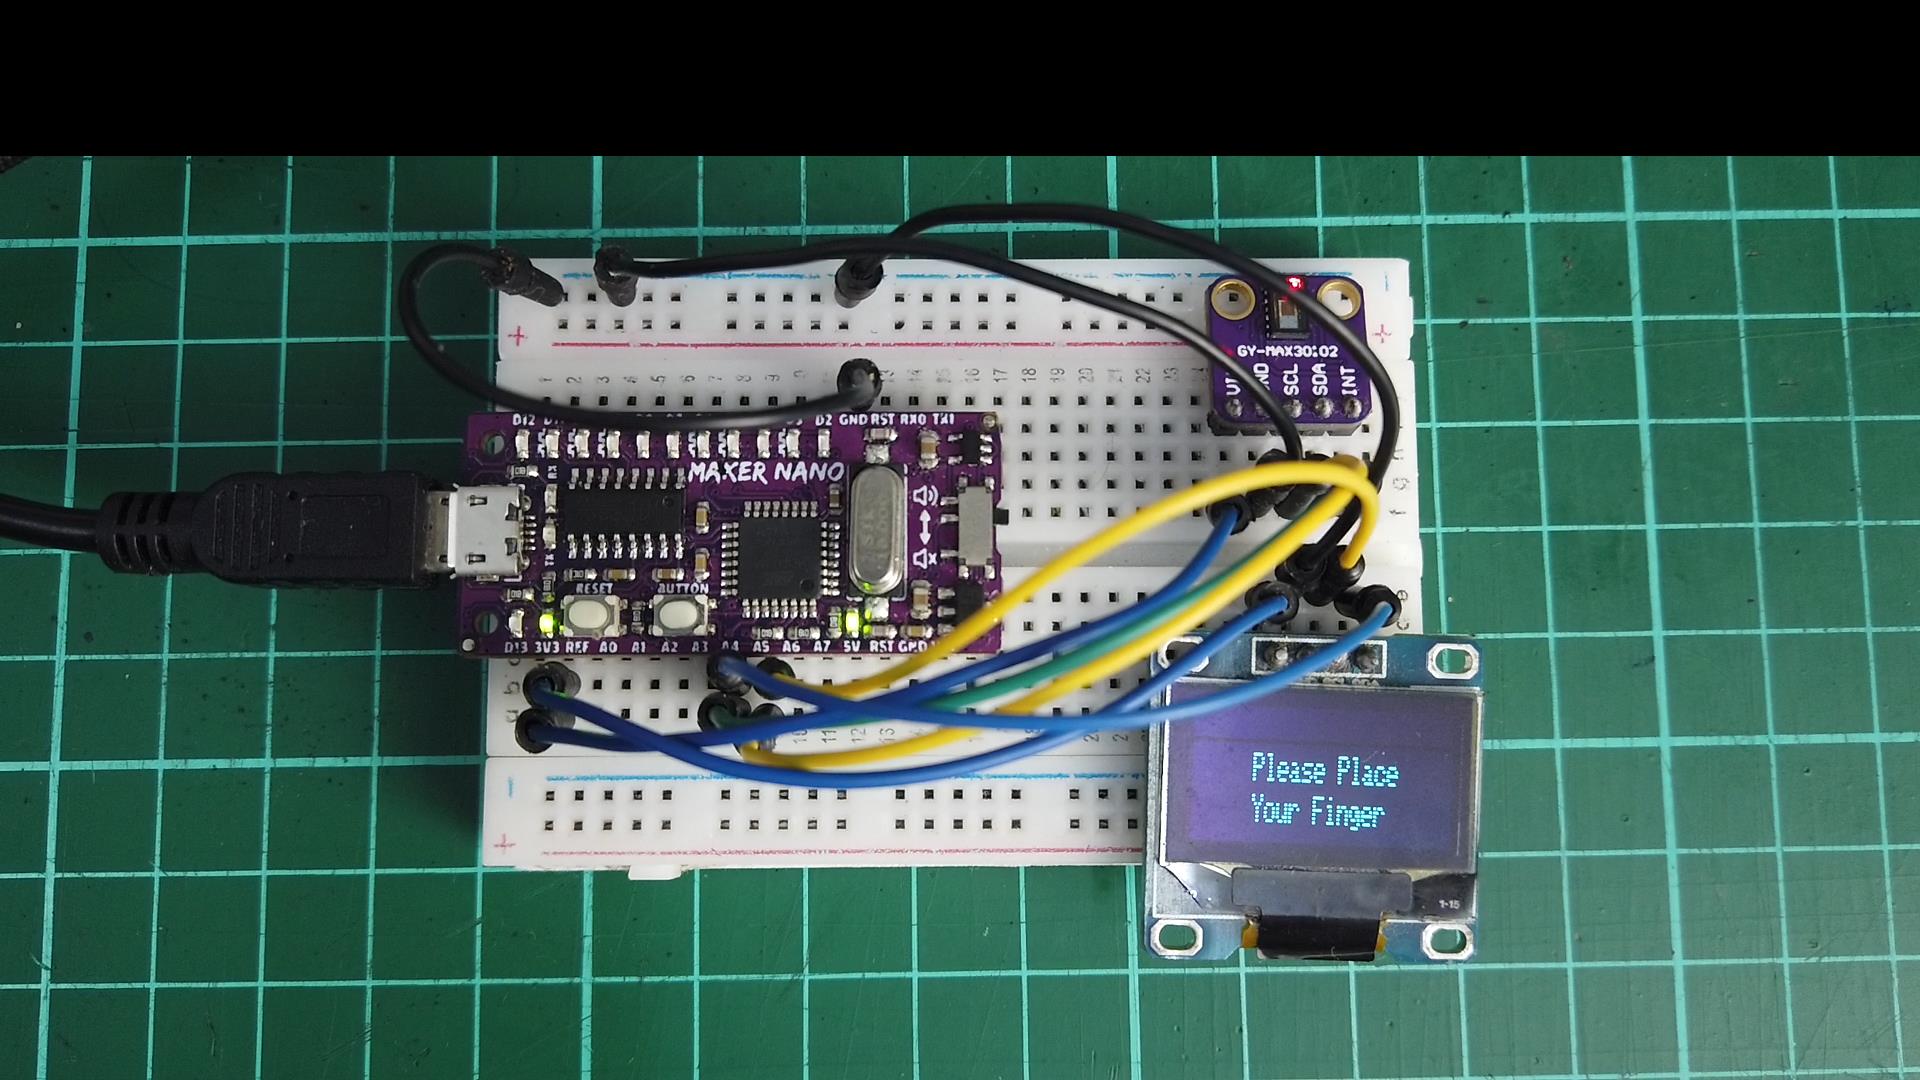
The power for both the mlx30102 and oled is obtained from the Maker Nano.
Code
The code for this tutorial is as shown below. Make sure to download the necessary library from the library manager
/* This code is a modified version of the code developed from the site called www.surtrtech.com

 * It's displays the Average BPM on the screen, with an animation and a buzzer sound

 * everytime a heart pulse is detected

 * It's a modified version of the HeartRate library example

 */
#include
#include
#include

#include "MAX30105.h"           //MAX3010x library

#include "heartRate.h"          //Heart rate calculating algorithm
MAX30105 particleSensor;
const byte RATE_SIZE = 4; //Increase this for more averaging. 4 is good.

byte rates[RATE_SIZE]; //Array of heart rates

byte rateSpot = 0;

long lastBeat = 0; //Time at which the last beat occurred

float beatsPerMinute;

int beatAvg;
#define SCREEN_WIDTH 128 // OLED display width, in pixels

#define SCREEN_HEIGHT 32 // OLED display height, in pixels

#define OLED_RESET    -1 // Reset pin # (or -1 if sharing Arduino reset pin)
Adafruit_SSD1306 display(SCREEN_WIDTH, SCREEN_HEIGHT, &Wire, OLED_RESET); //Declaring the display name (display)
static const unsigned char PROGMEM logo2_bmp[] =

{ 0x03, 0xC0, 0xF0, 0x06, 0x71, 0x8C, 0x0C, 0x1B, 0x06, 0x18, 0x0E, 0x02, 0x10, 0x0C, 0x03, 0x10,   //Logo2 and Logo3 are two bmp

0x04, 0x01, 0x10, 0x04, 0x01, 0x10, 0x40, 0x01, 0x10, 0x40, 0x01, 0x10, 0xC0, 0x03, 0x08, 0x88,     //pictures that display on the

0x02, 0x08, 0xB8, 0x04, 0xFF, 0x37, 0x08, 0x01, 0x30, 0x18, 0x01, 0x90, 0x30, 0x00, 0xC0, 0x60,     //OLED if called

0x00, 0x60, 0xC0, 0x00, 0x31, 0x80, 0x00, 0x1B, 0x00, 0x00, 0x0E, 0x00, 0x00, 0x04, 0x00,  };
static const unsigned char PROGMEM logo3_bmp[] =

{ 0x01, 0xF0, 0x0F, 0x80, 0x06, 0x1C, 0x38, 0x60, 0x18, 0x06, 0x60, 0x18, 0x10, 0x01, 0x80, 0x08,

0x20, 0x01, 0x80, 0x04, 0x40, 0x00, 0x00, 0x02, 0x40, 0x00, 0x00, 0x02, 0xC0, 0x00, 0x08, 0x03,

0x80, 0x00, 0x08, 0x01, 0x80, 0x00, 0x18, 0x01, 0x80, 0x00, 0x1C, 0x01, 0x80, 0x00, 0x14, 0x00,

0x80, 0x00, 0x14, 0x00, 0x80, 0x00, 0x14, 0x00, 0x40, 0x10, 0x12, 0x00, 0x40, 0x10, 0x12, 0x00,

0x7E, 0x1F, 0x23, 0xFE, 0x03, 0x31, 0xA0, 0x04, 0x01, 0xA0, 0xA0, 0x0C, 0x00, 0xA0, 0xA0, 0x08,

0x00, 0x60, 0xE0, 0x10, 0x00, 0x20, 0x60, 0x20, 0x06, 0x00, 0x40, 0x60, 0x03, 0x00, 0x40, 0xC0,

0x01, 0x80, 0x01, 0x80, 0x00, 0xC0, 0x03, 0x00, 0x00, 0x60, 0x06, 0x00, 0x00, 0x30, 0x0C, 0x00,

0x00, 0x08, 0x10, 0x00, 0x00, 0x06, 0x60, 0x00, 0x00, 0x03, 0xC0, 0x00, 0x00, 0x01, 0x80, 0x00  };
void setup() {

  display.begin(SSD1306_SWITCHCAPVCC, 0x3C); //Start the OLED display

  display.display();

  delay(3000);

  // Initialize sensor

  particleSensor.begin(Wire, I2C_SPEED_FAST); //Use default I2C port, 400kHz speed

  particleSensor.setup(); //Configure sensor with default settings

  particleSensor.setPulseAmplitudeRed(0x0A); //Turn Red LED to low to indicate sensor is running

  welcome();

  delay(3000);
}
void loop() {
long irValue = particleSensor.getIR(); //Reading the IR value it will permit us to know if there's a finger on the sensor or not
//Also detecting a heartbeat
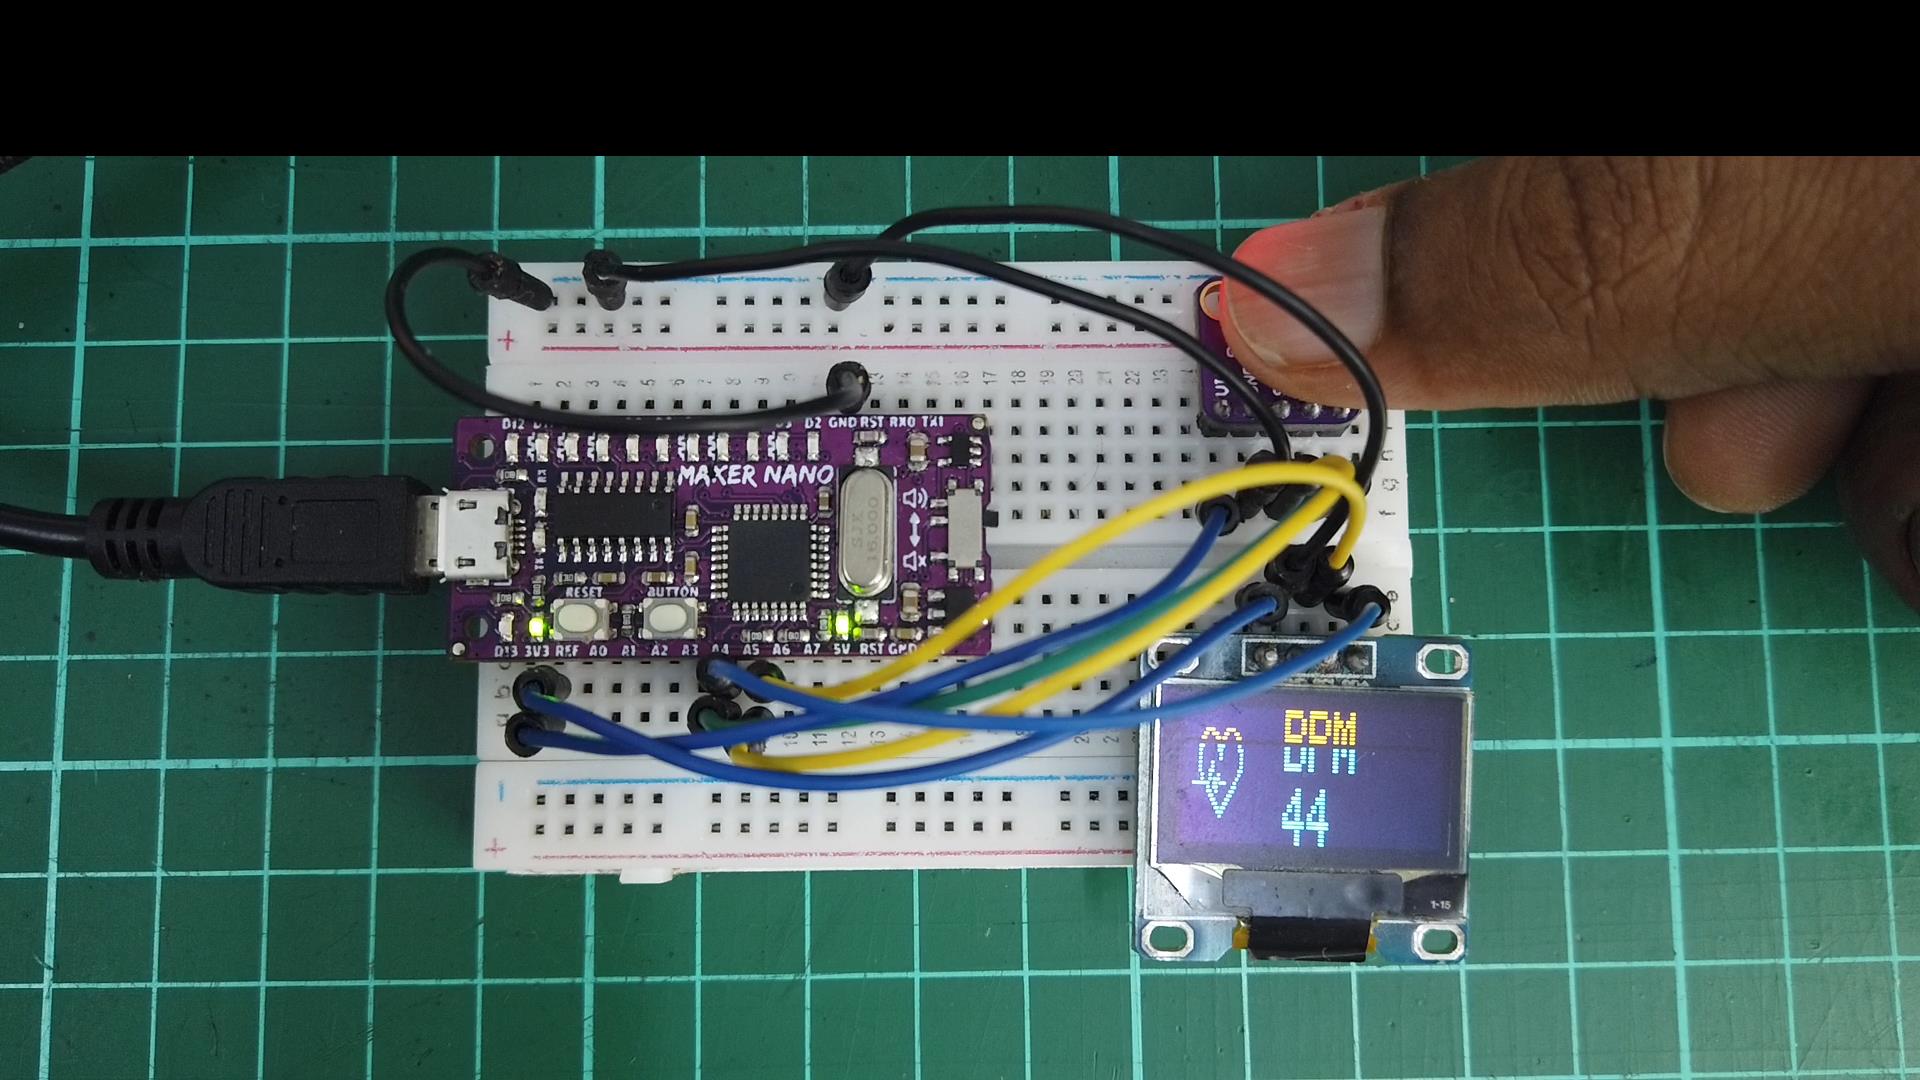
if(irValue > 7000){ //If a finger is detected
display.clearDisplay(); //Clear the display
display.drawBitmap(5, 5, logo2_bmp, 24, 21, WHITE); //Draw the first bmp picture (little heart)
display.setTextSize(2); //Near it display the average BPM you can display the BPM if you want
display.setTextColor(WHITE);
display.setCursor(50,0);
display.println("BPM");
display.setCursor(50,18);
display.println(beatAvg);
display.display();
if (checkForBeat(irValue) == true) //If a heart beat is detected
{
display.clearDisplay(); //Clear the display
display.drawBitmap(0, 0, logo3_bmp, 32, 32, WHITE); //Draw the second picture (bigger heart)
display.setTextSize(2); //And still displays the average BPM
display.setTextColor(WHITE);
display.setCursor(50,0);
display.println("BPM");
display.setCursor(50,18);
display.println(beatAvg);
display.display();
tone(8,1000); //And tone the buzzer for a 100ms you can reduce it it will be better
delay(100);
noTone(8); //Deactivate the buzzer to have the effect of a "bip"
//We sensed a beat!
long delta = millis() - lastBeat; //Measure duration between two beats
lastBeat = millis();
beatsPerMinute = 60 / (delta / 1000.0); //Calculating the BPM
    if (beatsPerMinute < 255 && beatsPerMinute > 20)     //To calculate the average we strore some values (4) then do some math to

    {                                                    //calculate the average

      rates[rateSpot++] = (byte)beatsPerMinute; //Store this reading in the array

      rateSpot %= RATE_SIZE; //Wrap variable
      //Take average of readings

      beatAvg = 0;

      for (byte x = 0 ; x < RATE_SIZE ; x++)

        beatAvg += rates[x];

      beatAvg /= RATE_SIZE;

    }

  }
}

  if (irValue < 7000){       //If no finger is detected it inform the user and put the average BPM to 0 or it will be stored for the

     beatAvg=0;              //next measure

     display.clearDisplay();

     display.setTextSize(1);

     display.setTextColor(WHITE);

     display.setCursor(30,10);

     display.println("Please Place ");

     display.setCursor(30,20);

     display.println("Your Finger ");

     display.display();

     noTone(8);

     }
}
void welcome()

{

    display.clearDisplay();

    display.setTextSize(2);

    display.setTextColor(WHITE);

    display.setCursor(6,0);

    display.println("HEART BEAT");

    display.setCursor(25,15);

    display.println("MONITOR");

    display.display();

    delay(1000);

    display.clearDisplay();

    display.setTextSize(2);

    display.setCursor(35,0);

    display.println("WITH");

    display.setCursor(6,15);

    display.println("MAKER NANO");

    display.display();

}
Outcome
Thank You
Thanks for reading this tutorial. If you have any technical inquiries, please post at Cytron Technical Forum.
"Please be reminded, this tutorial is prepared for you to try and learn.
You are encouraged to improve the code for a better application."