 International
 Singapore
 Malaysia
 Thailand
 Vietnam
Không có sản phẩm trong giỏ hàng!

AI Table Monitoring System with Nvidia Jetson Orin Nano
- Huck Phin Ch’ng
- 30 Jul 2024
- Tutorial
- 470
Introduction
This tutorial will cover how to build a simple cafe table monitoring prototype system that can tell the baristas at a cafe if a table is unoccupied, occupied or needs cleaning (i.e. after cafe patrons leave a table). Baristas will be notified of the change of status via both a buzzer and LED lights. Detection will be done through computer vision, specifically object detection.
Hardware
For this tutorial, we will use Cytron’s NVIDIA Jetson Orin Nano Training Kit which includes the core components required for this tutorial:
NVidia Jetson Orin Nano 8GB Dev Kit with JetPack 5.1.2
CSI Cable
3 different colour LEDs (need to get separately)
Passive buzzer (need to get separately)
Jumper wires (need to get separately)
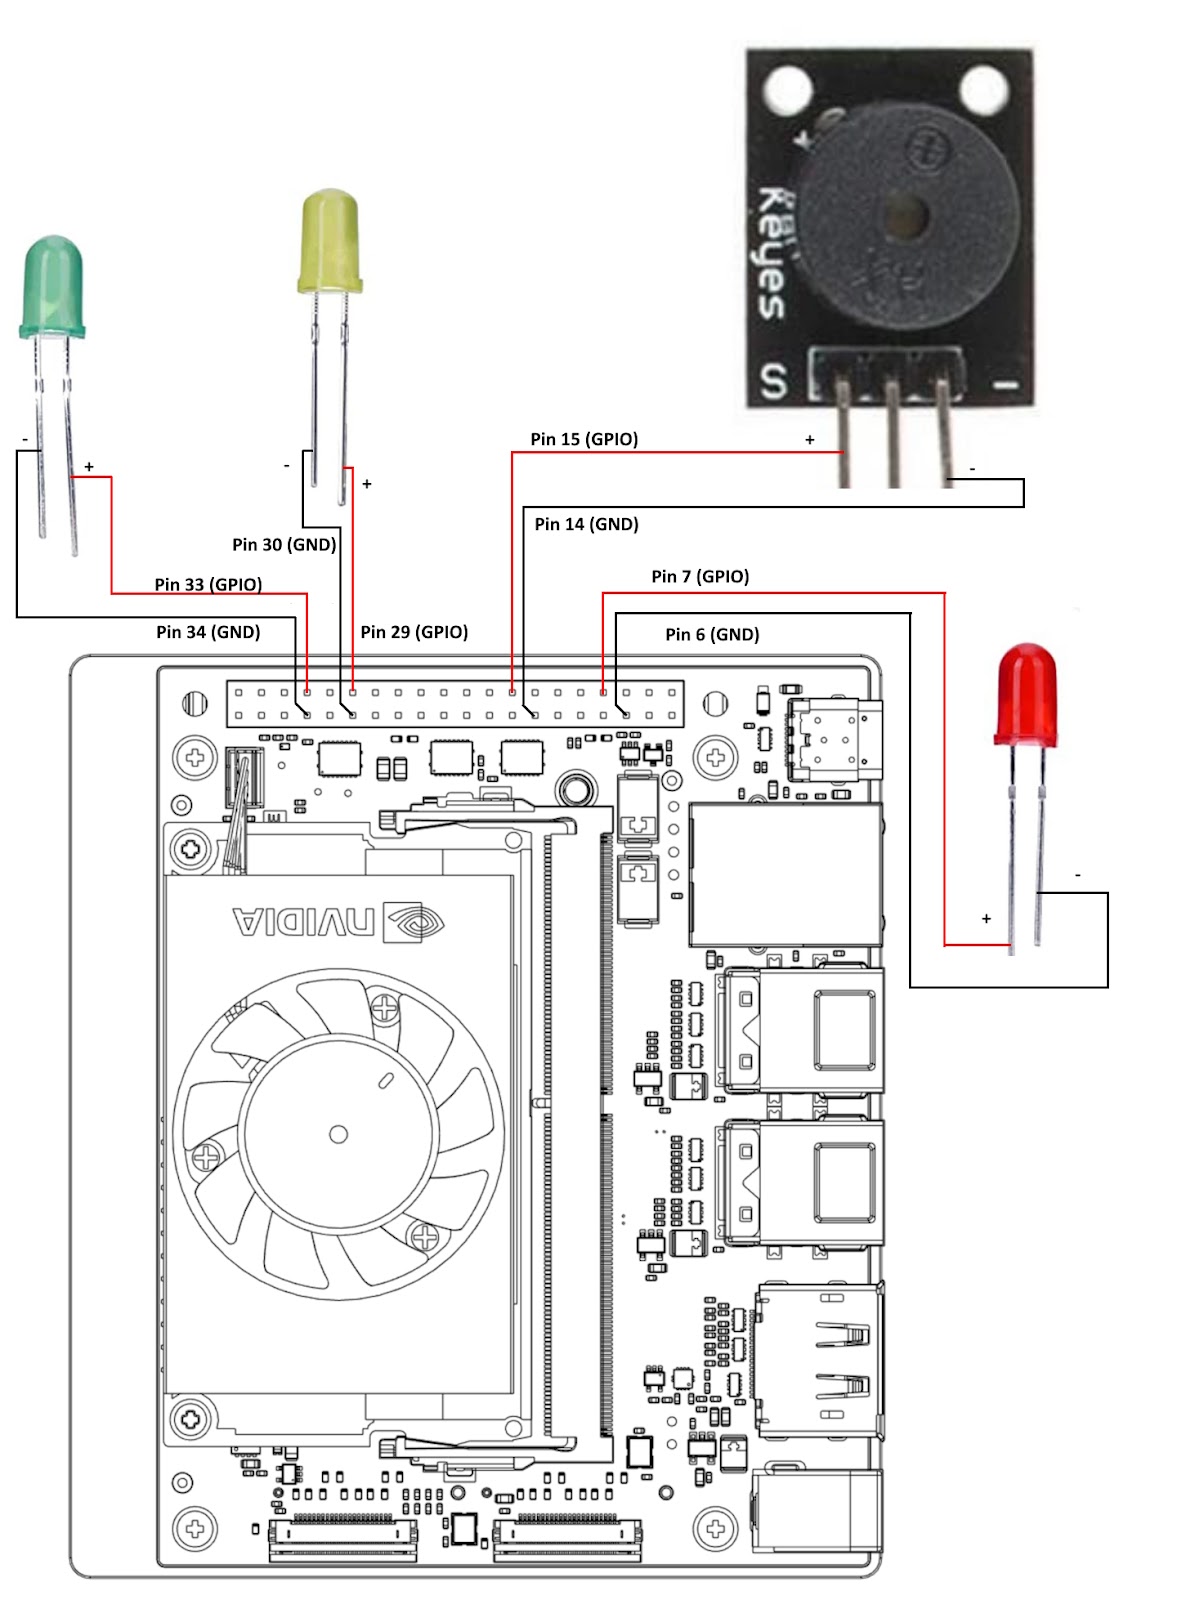
For your red LED, connect the positive leg to pin 7 (GPIO) and the negative leg to pin 6 (GND)
For your yellow LED, connect the positive leg to pin 29 (GPIO) and the negative leg to pin 30 (GND)
For your green LED, connect the positive leg to pin 33 (GPIO) and the negative leg to pin 34 (GND)
For your buzzer, connect the positive leg to pin 15 (GPIO) and the negative leg to pin 14 (GND)
If you want to check that your LEDs and buzzer are working correctly before preceding, you may check out our other tutorials for reference:
Use LED with Nvidia Jetson Orin Nano GPIO
Use Buzzer with Nvidia Jetson Orin Nano GPIO
Software
For this tutorial, we will tap into the vast resources included with the jetson-inference Github repository. Learn more about the jetson-inference Github repository with Cytron’s
Turn on your NVIDIA Jetson Orin Nano and download a copy of the detectnet.py file from the jetson-inference GitHub repository to your home directory as cafesystem.py.
wget -O cafesystem.py https://raw.githubusercontent.com/dusty-nv/jetson-inference/master/python/examples/detectnet.py
Open the cafesystem.py file.
gedit cafesystem.py
At line 26, we are going to add 2 more lines to import both Jetson.GPIO and time libraries.
import Jetson.GPIO as GPIO

import time
These 2 libraries allow us to interact with the Nvidia Jetson Orin Nano expansion pins and allow us to set delays in our program.

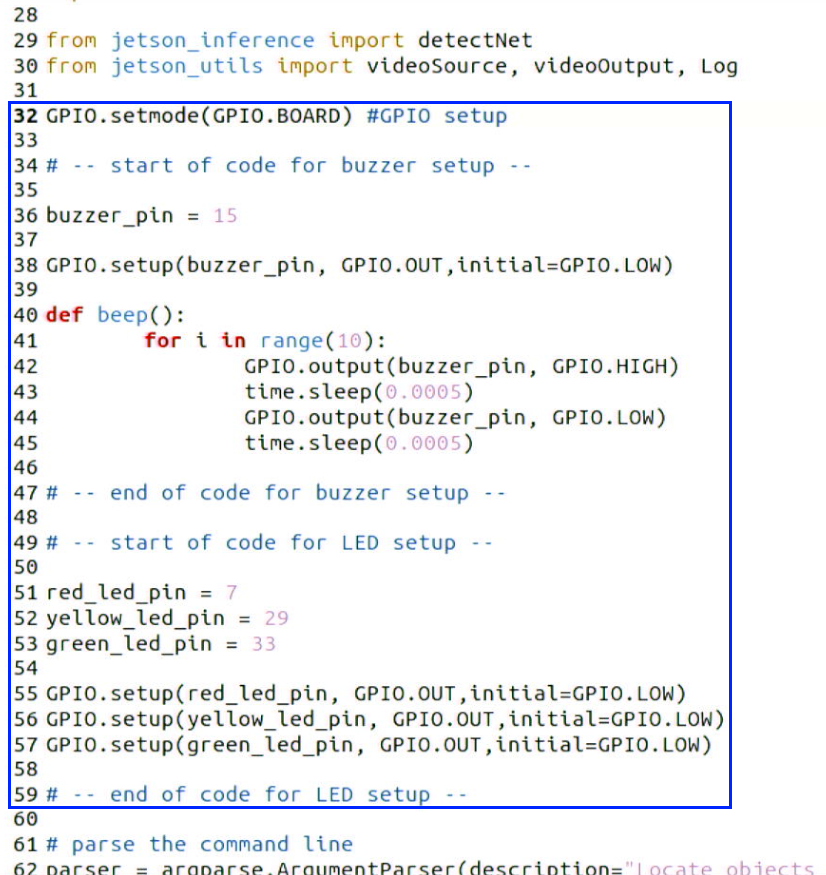
At line 32, we add 28 lines of code to set the GPIO, LEDs and buzzer
GPIO.setmode(GPIO.BOARD) #GPIO setup


# -- start of code for buzzer setup --


buzzer_pin = 15


GPIO.setup(buzzer_pin, GPIO.OUT,initial=GPIO.LOW)


def beep():

    for i in range(10):

        GPIO.output(buzzer_pin, GPIO.HIGH)

        time.sleep(0.0005)

        GPIO.output(buzzer_pin, GPIO.LOW)

        time.sleep(0.0005)


# -- end of code for buzzer setup --


# -- start of code for LED setup --


red_led_pin = 7

yellow_led_pin = 29

green_led_pin = 33


GPIO.setup(red_led_pin, GPIO.OUT,initial=GPIO.LOW)

GPIO.setup(yellow_led_pin, GPIO.OUT,initial=GPIO.LOW)

GPIO.setup(green_led_pin, GPIO.OUT,initial=GPIO.LOW)


# -- end of code for LED setup --
(Line 32 to 38) This code first sets it so we declare the pin declaration to go by the physical pin numbers. Then we write logic that the buzzer is connected pin 15, it is to be treated as an output pin and on initialization, set to not output.
(Line 40 to 45) We define a function called beep(). A passive buzzer requires a rapid pulse signal. We can accomplish this by switching between sending HIGH and LOW signals with a very, very small delay in between.
(Line 51 to 57) We write logic that our red LED is connected to pin 7,yellow LED is connected to pin 29 and green LED is connected to pin 33. Also, all LEDs is to be treated as an output and on initialization, set to not output.
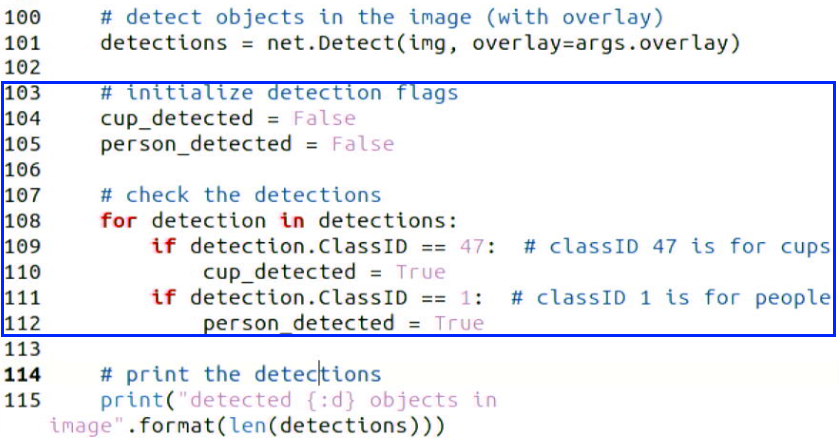
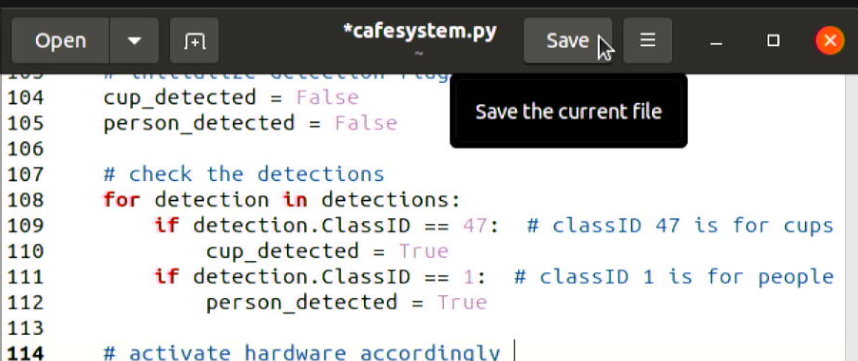
At line 103 We then insert 10 lines to declare new variables and logic.
# initialize detection flags

    cup_detected = False

    person_detected = False


    # check the detections

    for detection in detections:

        if detection.ClassID == 47:  # classID 47 is for cups

            cup_detected = True

        if detection.ClassID == 1:  # classID 1 is for people

            person_detected = True
We declare new flags which later will be used to decide how our LEDs and buzzer will turn on. Then based on the detection results, if a class with an ID of 47 was detected, we set the cup_detected flag to true. Also if a class with an ID of 1 was detected, we set the person_detected flag to true.
NOTE: detectnet.py by default uses the SSD-Mobilenet-v2 model. We can reference the model class labels to know that class ID 47 = cups and class ID 1 = person.
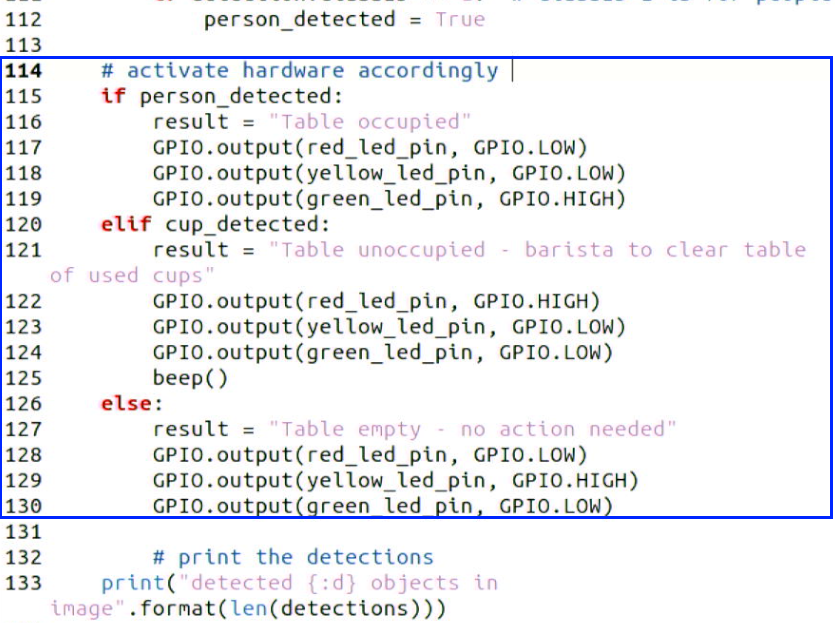
At line 114, we add these 17 that activate our LEDs and buzzer accordingly
# activate hardware accordingly

    if person_detected:

        result = "Table occupied"

        GPIO.output(red_led_pin, GPIO.LOW)

        GPIO.output(yellow_led_pin, GPIO.LOW)

        GPIO.output(green_led_pin, GPIO.HIGH)

    elif cup_detected:

        result = "Table unoccupied - barista to clear table of used cups"

        GPIO.output(red_led_pin, GPIO.HIGH)

        GPIO.output(yellow_led_pin, GPIO.LOW)

        GPIO.output(green_led_pin, GPIO.LOW)

        beep()

    else:

        result = "Table empty - no action needed"

        GPIO.output(red_led_pin, GPIO.LOW)

        GPIO.output(yellow_led_pin, GPIO.HIGH)

        GPIO.output(green_led_pin, GPIO.LOW)
If our system has detected a person, we can rule that this means a table is occupied. So it lights up the green LED and turns off both the red and yellow LED. The buzzer is not activated.
If our system has detected a cup only, we can make the rule that this means that a table requires cleaning. So it lights up the red LED and turns off both the yellow and green LED. The buzzer is activated for an audible alert.
For other conditions, we can rule that this means a table is unoccupied. So it lights up the yellow LED and turns off both the red and green LED. The buzzer is not activated.
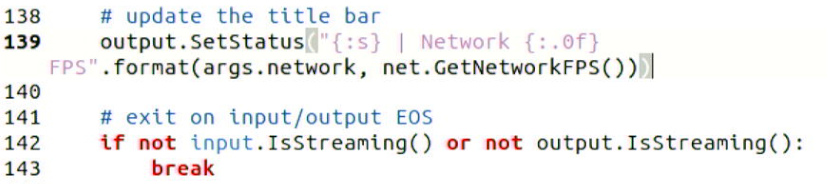
At lines 132 to 136, we delete these lines of existing code and replace them with new code to print to terminal result
#print the result

print (result)
So we can see the result we want clearer in the terminal. We replace the original code which prints to the terminal the full result of the object detection

Code after amendments
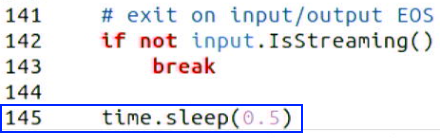
At line 141 and 142, we can delete these 2 lines of code. Again this is to see our results clearer.
Code after amendments
At line 145, we add a new line of code to set a small delay to slowdown the detection
time.sleep(0.5)
By slowdowns the detection slightly, we improve the effectiveness of our LEDs and buzzer as it will be more visually and audibly noticeable.
Save the code changes
Let’s move on to running this program. first, check that Jetson.GPIO is installed
sudo pip install Jetson.GPIO
It should say Requirement already satisfied: Jetson.GPIO in …

Then build the jetson-inference project from source. These are the commands:
sudo apt-get update
sudo apt-get install git cmake libpython3-dev python3-numpy
git clone --recursive --depth=1 https://github.com/dusty-nv/jetson-inference
cd jetson-inference
mkdir build
cd build
cmake ../
make -j$(nproc)
sudo make install
sudo ldconfig
Please reference the compiling the project documentation for Jetson Inference for a more detailed explanation of how to build the project including a breakdown of the individual commands.
Building the project is necessary to get the required libraries installed for our program to function.
NOTE: We cannot run our program inside the Docker container used in the Getting Started Guide - Computer Vision AI Training Kit with NVidia Jetson Orin Nano due to its lack of access to Jetson’s GPIO.
Finally, we can run our program in the terminal, first changing back into the home directory
cd
python3 cafesystem.py
You can now notice that when a person is detected, in the terminal, it will print Table occupied and the green LED lights up. When a cup is detected and no person is detected, in the terminal it will print the table that requires cleaning, the red LED lights up and the buzzer activates. Lastly, if neither a cup nor a person is detected, the yellow LED lights up.
Hardware Components
") Hết hàng
Hết hàngNVIDIA Jetson Orin Nano Developer Kit (8GB)
17,050,000₫ 15,500,000₫
x 1 đơn vị